Last updated:
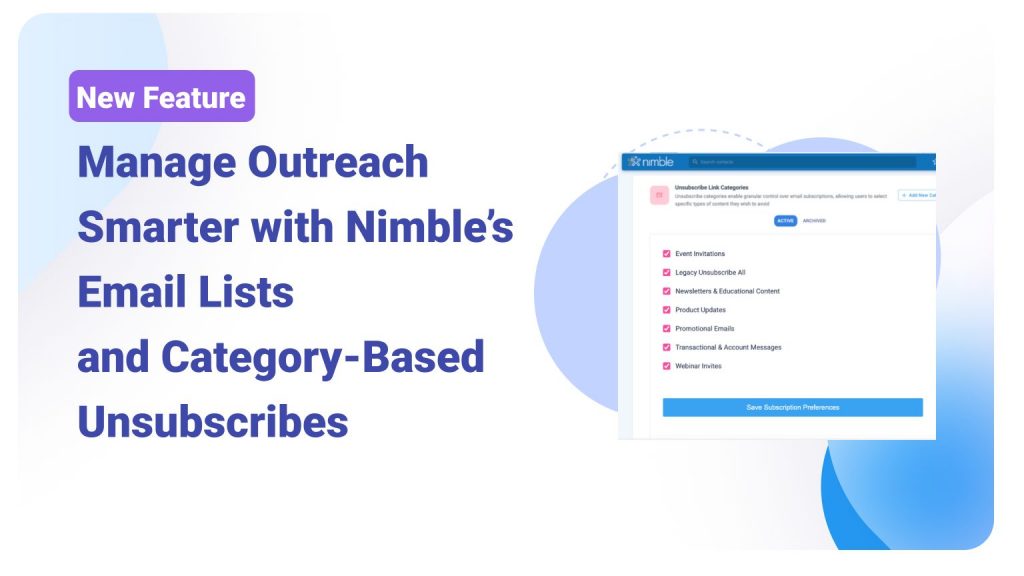
When you’re sending larger, ongoing email outreach — like product updates, promotions, or event invitations — keeping your contacts engaged is critical. Nimble’s built-in email marketing tool makes it easy to send campaigns at scale. And now, with Email Lists and category-based unsubscribes, you can organize your outreach more effectively, deliver more relevant messaging, and reduce churn.
Whether you’re sharing product news, promotional offers, or educational content, these updates help you send the right emails to the right audiences — boosting engagement and protecting deliverability.
How Smarter Email Management Helps You Reach the Right People, Keep Contacts Longer, and Drive Better Results
Email is one of the most powerful ways to connect with prospects and customers — but sending too many irrelevant messages can quickly do more harm than good. Overloading inboxes with content that doesn’t match audience interests often leads to:
- Lower engagement and open rates
- Higher unsubscribe rates
- Increased spam complaints
- Poorer deliverability
Nimble solves this challenge by combining Email Lists and Unsubscribe Categories to help you target smarter, personalize outreach, and retain more contacts — without creating extra work for your team.
- Target the right audience with Email Lists → Use Email Lists to organize contacts into groups based on interests, behavior, or campaign goals.
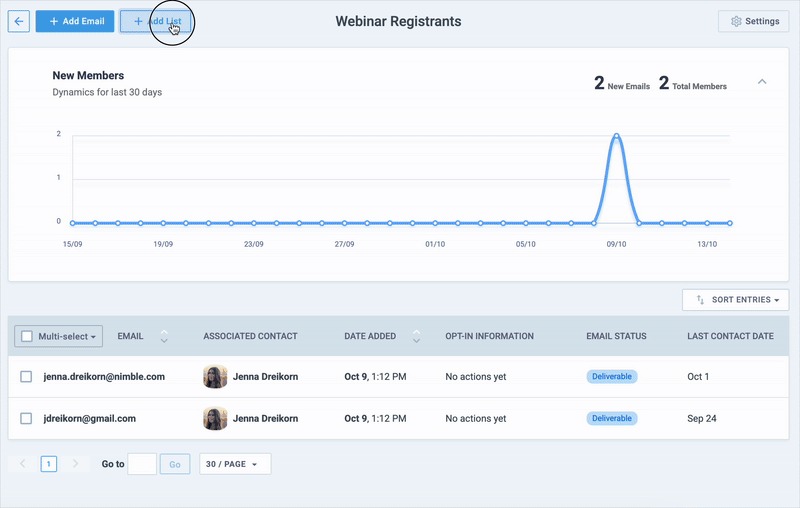
Example: If you’re launching a webinar for small business owners, you can build a dedicated “Webinar Registrants” list and follow up only with attendees afterward — instead of blasting your entire database. - Send relevant content with Unsubscribe Categories → Keep your emails aligned with what matters most to your audience by categorizing different types of outreach.
Example: If a customer opts out of Promotions but stays subscribed to Product Updates, Nimble ensures they only receive the information they care about. That means fewer unnecessary opt-outs and higher overall engagement. - Retain more contacts for the long term → Instead of forcing people to choose between “all or nothing” unsubscribes, you make it easy for them to stay connected to the updates they value most. Over time, this reduces churn and builds stronger relationships.
- Let subscribers choose what to unsubscribe from →Traditional unsubscribes often force people into an “all or nothing” decision: stay subscribed to everything or lose all communication. Nimble changes that by letting you create Unsubscribe Categories. Subscribers can opt out of specific types of content while staying connected to what they actually value.
By combining Email Lists for targeted outreach with Unsubscribe Categories for flexible preferences, you can send fewer emails while driving higher open rates, stronger engagement, and better overall results.
What Are Category-Based Unsubscribes?
Traditional unsubscribe links typically offer one option: opt out of everything. That approach limits your ability to tailor communications and often leads to unnecessary churn.
Category-based unsubscribes allow your recipients to opt out of specific types of email content while staying subscribed to others.
Example categories might include:
- Product Updates
- Promotional Offers
- Educational Content
- Webinars & Events
- Company Announcements
- Billing Reminders or Invoices
By giving contacts more control over what they receive, you reduce global unsubscribes, improve engagement, and stay aligned with privacy best practices.
Why Category-Based Unsubscribes Matter for Your Email Strategy
Category-based unsubscribes aren’t just a convenience—they’re a strategic way to retain more of your audience, reduce churn, and improve deliverability. By letting contacts opt out of specific types of communication, you avoid losing them entirely and keep your messaging relevant.
When subscribers have the power to choose what they opt out of, you keep your communication relevant and preserve long-term relationships. Here’s how thoughtful use of categories helps reduce churn and maintain engagement:
Here’s how thoughtful use of categories helps reduce unsubscribes and maintain engagement:
Product updates are important for customers who rely on new features or improvements. Even if they’re not interested in marketing emails, many still want release notes and product announcements.
Billing and account notifications are essential, but often missed if grouped with general emails. A separate category ensures invoices, receipts, and renewal alerts still get delivered—even when users unsubscribe from other content.
Promotions and special offers are often the first to go when inboxes get crowded. Keeping them in their own category lets users opt out of discounts without cutting off all communication.
Educational content and newsletters can be helpful early on but less relevant later. If these emails are categorized separately, users can stop receiving tips while still getting important updates.
Webinars and event invitations are high-frequency and not always relevant. Putting them in their own category lets less active users opt out of invites while staying subscribed to product or partner news.
By giving subscribers the choice to control what lands in their inbox, you build trust, reduce unnecessary opt-outs, and retain more contacts over the long term. Plus, you gain clearer insights into what your audience values most, helping you refine your strategy and strengthen engagement.
How It Works in Nimble
Setting up and using category-based unsubscribes in Nimble is simple—and built directly into your existing outreach process. You can create custom categories, assign them to your outreach, and give contacts more flexibility without changing how you work.
Free Guide
The ABCs of CRM
A Beginner's Guide to Understanding &
Using a CRM
Download Free
You’re All Set!
DownloadGet the most out of this guide by starting your free 14-day trial of Nimble today.
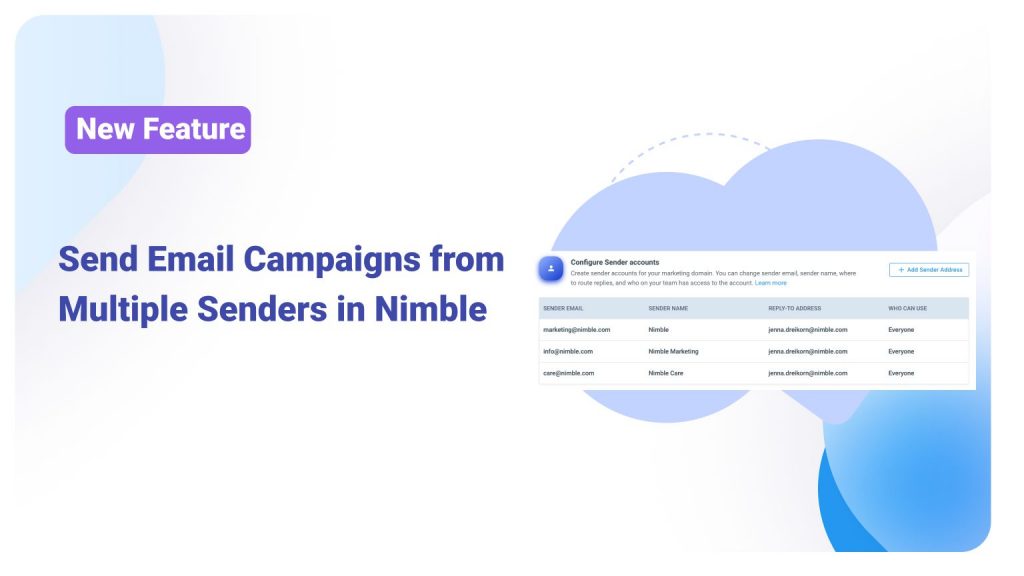
Create categories
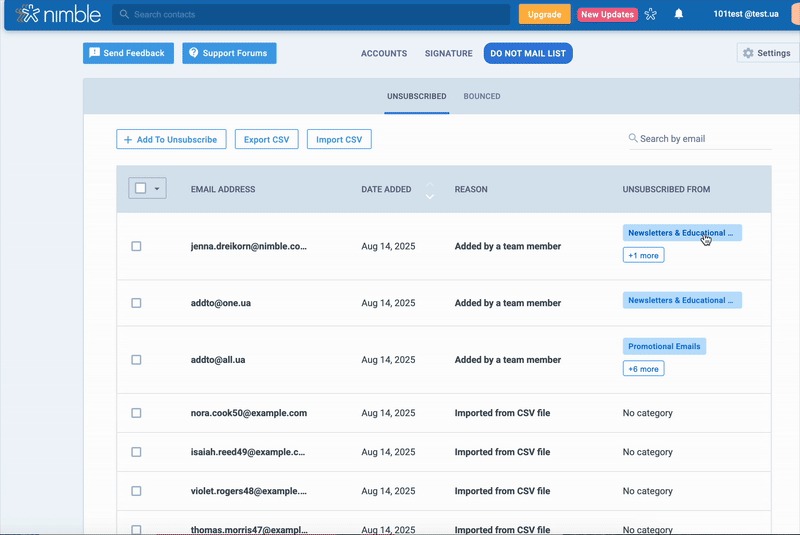
You can create as many unsubscribe categories as you need to reflect the types of emails you send—like Product Updates, Promotions, Billing, Webinars, or Newsletters. Categories can be archived at any time and permanently deleted if no contacts are unsubscribed from them.
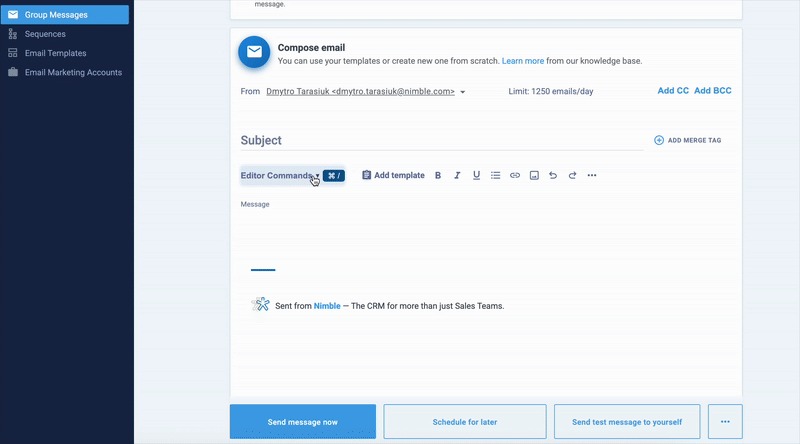
Assign categories to outbound emails
When sending a bulk email or sequence, you can now assign an Unsubscribe Category to your outreach.
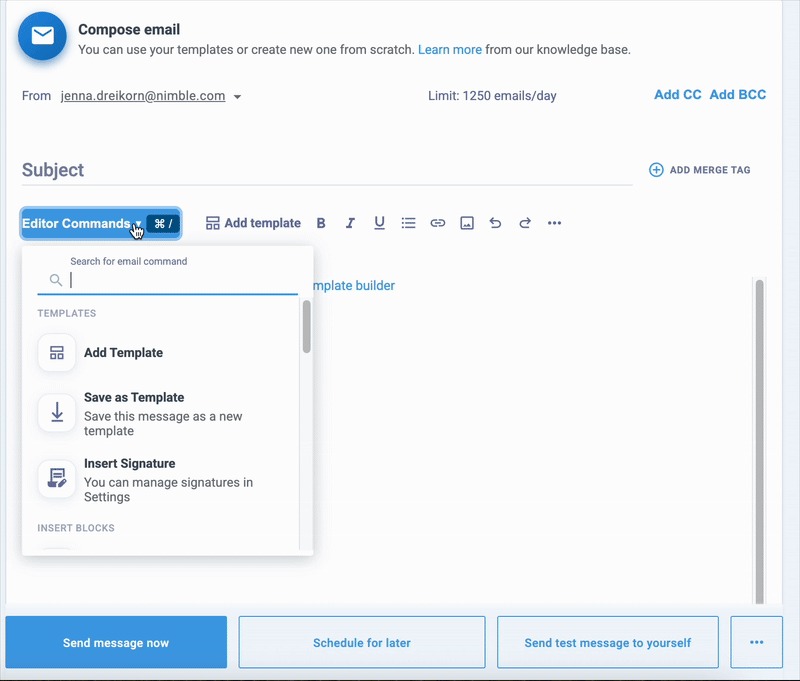
In the email composer, open the Editor Commands menu, click Unsubscribe Link, and select one or more categories from your available options.
For any outreach like group messages or sequences, assigning at least one category is required. Recipients who click the unsubscribe link will only be unsubscribed from the categories you choose—allowing them to stay subscribed to your other communications.
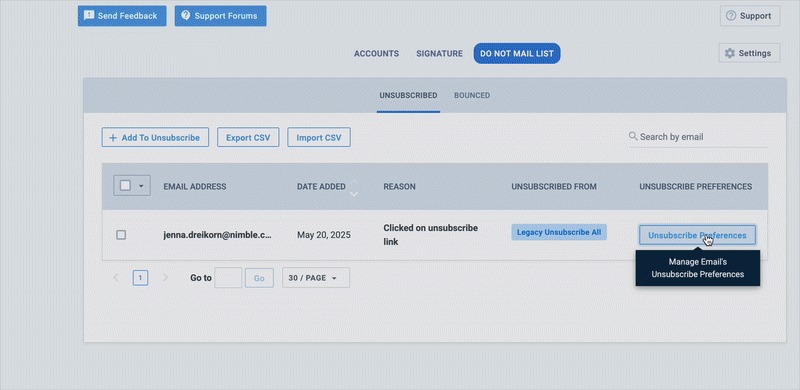
Manage Unsubscribe Options for Individual Contacts
Additionally, you can also manage a person’s unsubscribe preferences by selecting or deselecting specific categories of communication such as event invitations, newsletters, product updates, promotional emails, transactional messages, and webinar invites. This lets you tailor which types of emails they’ll continue to receive instead of removing them from all communications entirely.
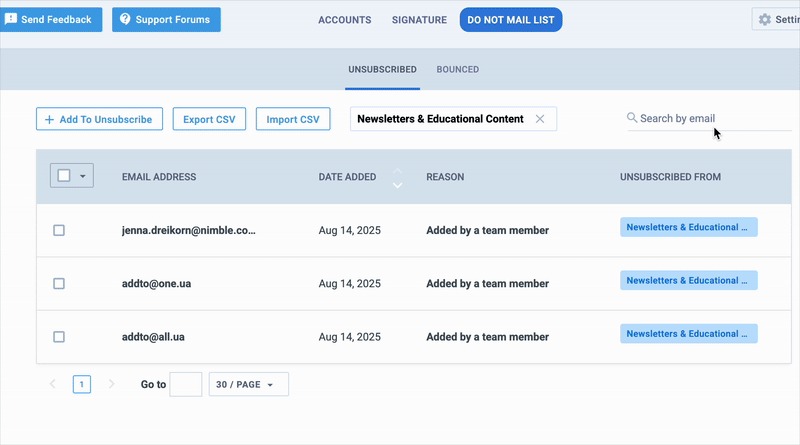
Track who’s unsubscribed from each category
You can easily see which contacts have unsubscribed from a specific category. Simply click into the category in your Unsubscribe Categories list to view all contacts who are currently opted out of that type of email. This gives you clear visibility into your audience preferences and helps you tailor your outreach accordingly.
Add a Manage Unsubscribe Preferences to group messages
Make it easy for recipients to control what they receive by including a “Manage Unsubscribe Preferences” in every group message. When clicked, contacts can instantly update their preferences and choose which categories they want to stay subscribed to—without leaving your email. This not only keeps your outreach compliant but also shows respect for your audience’s choices, helping you build trust and reduce total unsubscribes.

How to Set It Up
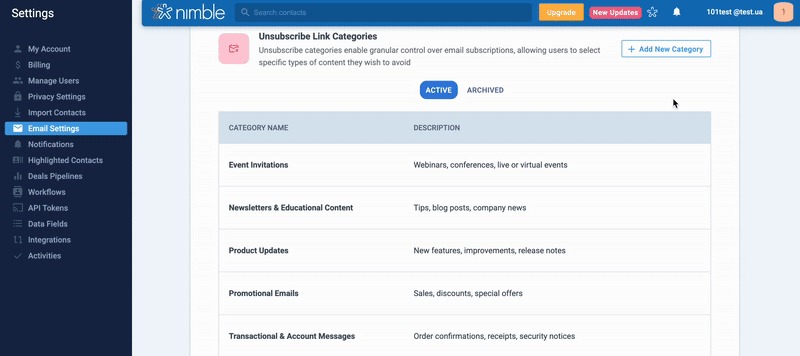
1. Access Your Unsubscribe Settings
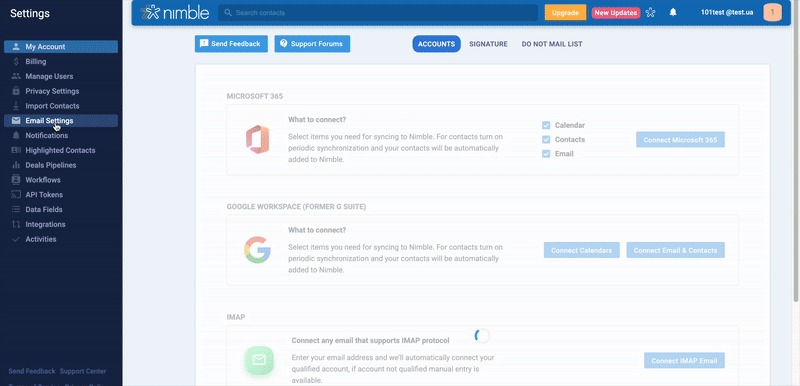
- In Nimble, go to Settings from the main menu.
- Under the Email Settings section, click Do Not Mail List.
- This is where you’ll manage all categories, create new ones, and view who’s unsubscribed from each.
2. Create an Unsubscribe Category
- In the Unsubscribe Categories page, click + New Category.
- Give your category a clear name that matches the type of email you send—e.g., Webinars, Billing, Product Updates, or Promotions.
- Click Save to add it to your list.
- You can create as many categories as needed or archive ones you’re not currently using.

3. See Who’s in an Unsubscribe Category
- From the Unsubscribe Categories page, click on the name of any category.
- You’ll see a list of all contacts who have unsubscribed from that category.
- Use this view to monitor audience preferences, refine your messaging, and ensure you’re only sending emails they want to receive.
4. Add an Unsubscribe Category to Your Email
- When composing a bulk email or sequence, open the Editor Commands menu in the email composer.
- Click Unsubscribe Link, then select one or more categories from your list.
- For promotional emails, selecting at least one category is required.
- Nimble will automatically insert the correct unsubscribe link in your email footer, ensuring that any unsubscribes apply only to the selected category.

5. Adding Manage Unsubscribe Category Preferences
- When composing a bulk email or sequence, open the Editor Commands menu in the email composer.
- Click Add Manage Unsubscribe Preferences Link.
- Then, click on the Unsubscribe Categories you want recipients to be able to choose from.
- Nimble automatically inserts the correct unsubscribe link in your email footer, ensuring any opt-outs apply only to the categories you selected.
What About Legacy Unsubscribes?
Contacts who unsubscribed before this feature launched are now considered legacy unsubscribes. These users are still fully respected and remain on your Do Not Mail list.
At this time:
- You cannot assign legacy unsubscribes to specific categories
- They are considered fully unsubscribed from all email types
- They will stay excluded from all outbound communication unless they manually resubscribe
This ensures your email practices remain compliant and that past unsubscribe preferences are preserved without disruption.
What Are Email Lists in Nimble
Email Lists in Nimble help you organize and target contacts more effectively when sending campaigns. Instead of sending every email to your entire database, you can build focused lists around specific goals, audiences, or initiatives. This ensures your outreach is more relevant, less overwhelming, and more likely to drive engagement.
With Email Lists, you can:
- Group contacts based on shared interests, behaviors, or campaign goals
- Send bulk emails or automated sequences to specific audiences
- Keep campaigns organized and separated from your master database
- Automatically sync unsubscribe preferences to maintain clean, compliant lists
For example, if you’re hosting a webinar, you can create a “Webinar Attendees” list to send event reminders and post-event follow-ups — without cluttering inboxes for people who didn’t register. Similarly, you could create a “VIP Customers” list to share exclusive offers, early-access product updates, or personalized invites designed to strengthen relationships with your highest-value clients.
By using Email Lists, you make your campaigns more targeted, more efficient, and more engaging — while improving deliverability and retention.
***Note: Nimble Email Lists are available only to users who have the Email Marketing add-on enabled. Learn more about Nimble Marketing here: Getting Started with Nimble Email Marketing
How Email Lists Differ from Tags
While both Email Lists and Tags help you organize contacts, they serve different purposes:
| Feature | Email Lists | Tags |
| Purpose | Organize contacts for targeted campaigns | Classify and filter contacts for internal management |
| Best For | Defining audiences for group messages or sequences | Segmenting contacts based on attributes, lifecycle stage, or workflows |
| Example Use | Send updates to a “Product Announcements” list | Tag contacts as “Lead,” “Customer,” or “Partner” |
| Opt-In Behavior | Email lists include subscription confirmation (double opt-in) | Tags do not include subscription confirmation |
Where to Find and Manage Email Lists in Nimble
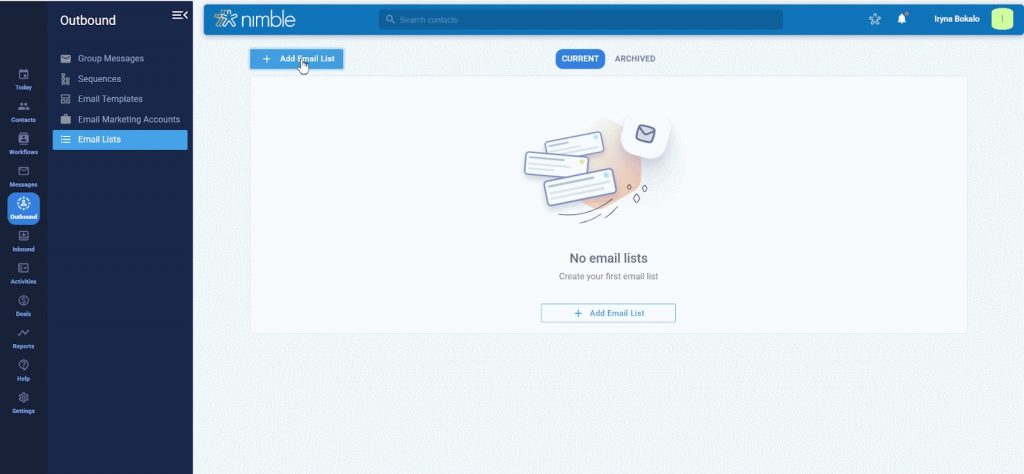
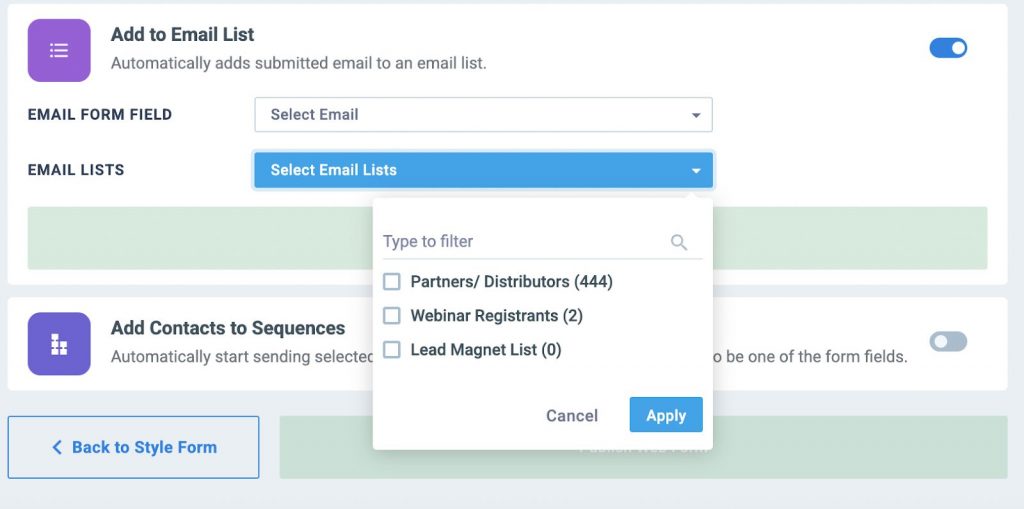
You can find your Email Lists under Outbound → Email Lists in Nimble. From there, click Create Email List to name your list, set permissions, and start adding contacts.
You can build your lists using segments, tags, or custom searches, or add individual emails manually. You can also head to the Contacts page, select multiple contacts, and choose Add to Email List from the Actions menu to bulk add them.
If you’re using Nimble Web Forms, you can even automate this step — whenever someone submits a form, their response can be automatically added to a specific email list for follow-up or nurturing.
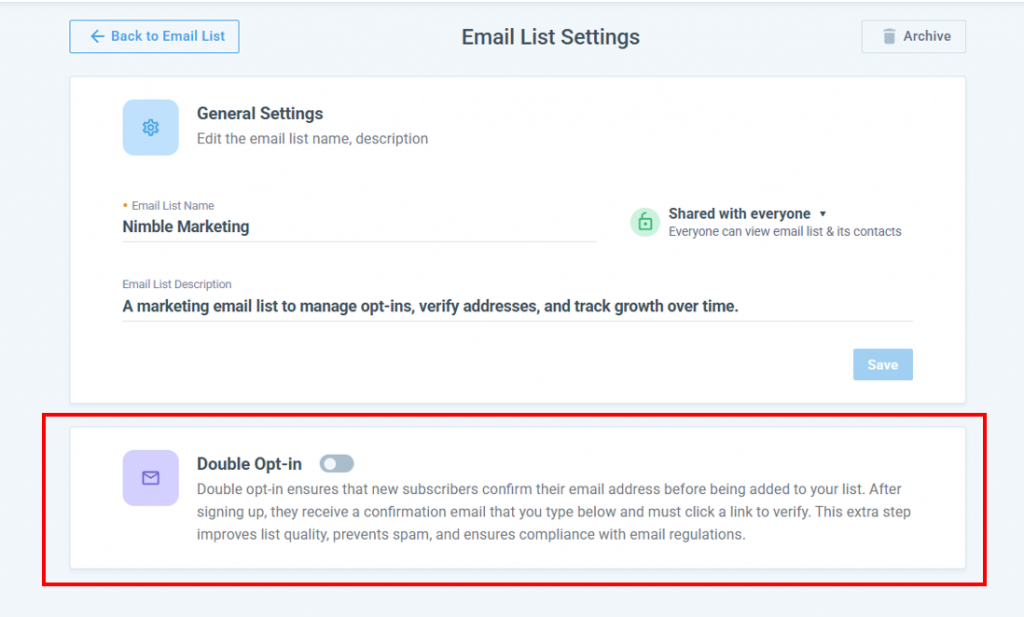
Additionally, you can enable the double opt-in option. Nimble double opt-in helps ensure higher list quality, reduces spam sign-ups, and keeps you compliant with email regulations.
This means that when you have double opt-in turned on, contacts who have entered the email list will receive an email to confirm their subscription.
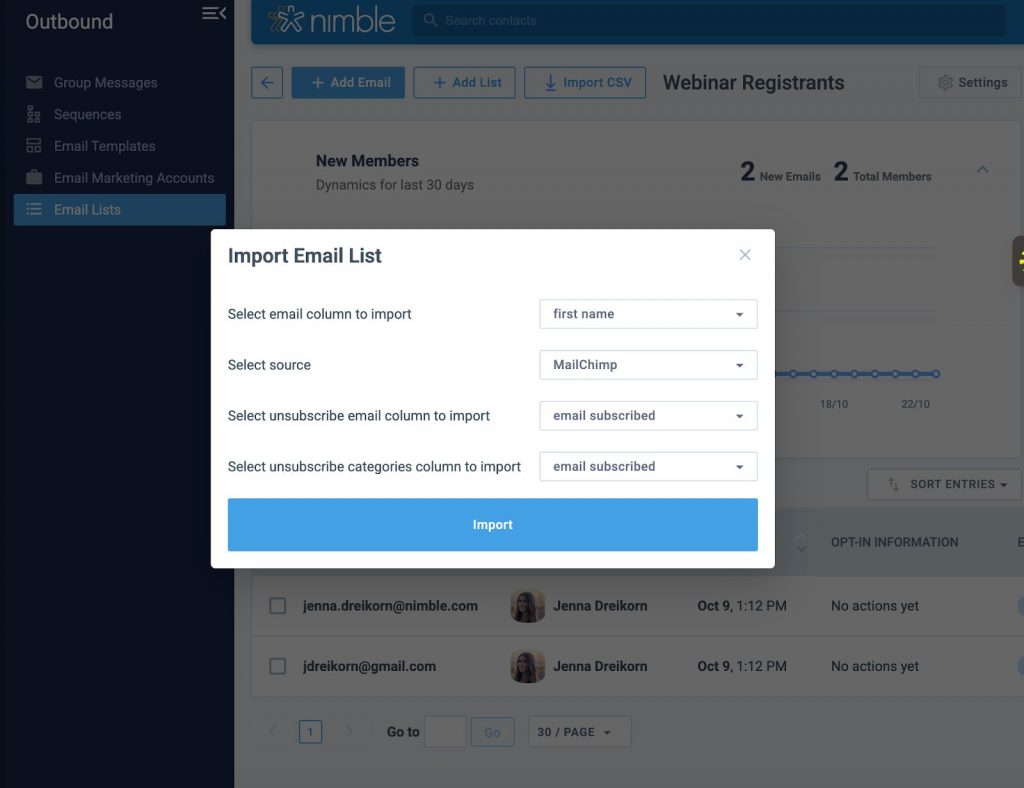
Adding Email Lists from a CSV File
You can quickly add new contacts to an existing email list or create a new one by importing a CSV file.
- Go to Email List Settings.
- Click the Import CSV button.
- Upload your file from your computer.
- Match your fields (e.g., Name, Email, Company) to ensure each column maps correctly in Nimble.
- Confirm the import. Contacts will be added to your selected list, and subscription confirmation (double opt-in) will automatically apply for new subscribers.
Using Email Lists and Unsubscribe Categories Together
Email Lists and Unsubscribe Categories work best when used together to make your outreach more targeted, relevant, and effective.
Start by using Email Lists to define who you’re reaching. For example, you might create a “Webinar Attendees” list to follow up with people who registered for an event. This ensures your campaign is going only to those who expressed interest — not your entire contact database.
Next, assign an Unsubscribe Category to the email, such as “Webinars & Events”. If someone on the list clicks “unsubscribe,” Nimble removes them only from future webinar-related outreach but keeps them eligible to receive other communications, like Product Updates or Educational Content.
This approach allows you to:
- Keep messaging relevant → Contacts receive updates that match their interests
- Reduce full opt-outs → People can stop one type of email without losing touch entirely
- Improve deliverability → Sending fewer irrelevant emails helps protect your sender reputation
By combining Email Lists for precise targeting with Unsubscribe Categories for preference management, you create a smarter, more personalized email strategy that builds trust, improves engagement, and reduces churn.
Get Started with Email Lists and Unsubscribe Categories
Ready to make the most of Email Lists and Unsubscribe Categories in Nimble? Our FAQs walk you through everything you need to know to organize your contacts, deliver more relevant campaigns, and keep engagement high.
Read the Email Lists FAQ → to learn how to create and manage targeted lists for more effective outreach.
Read the Unsubscribe Categories FAQ → to see how to set up categories that reduce churn and protect deliverability.
Together, these guides give you the insights you need to send smarter emails, retain more contacts, and improve campaign performance.