Last updated:
We’re excited to announce our new Nimble Workflow Automation Feature, a new way of automating repeatable engagement processes to scale your business relationships!
Nimble’s new Workflow Automations were built to automate routine processes and tasks for contacts and companies within our New Nimble Workflows Feature. Our Workflow Automations give you the ability to create triggered actions when moving a contact from one Workflow stage to the next. It is designed to make save time, build better relationships and win business with less effort.
So, What Are Workflow Automations?
Nimble Workflow Automations are actions based on triggers that cause an action to occur when moving a contact card from one stage to the next in Workflows. When you create a trigger, Nimble Automations will take specific actions for you such as creating activities, sending messages, creating notes, sending mobile or browser notifications, or even assigning tags.
Workflow Automations Feature Overview
Workflow Automations are actions based on triggers defined by you to help keep routine tasks from slipping through the cracks. Currently triggers are limited to contacts moving into Workflows and in between Stages.
You can also define a variety of actions when a contact enters the workflow or stage including; sending templated emails, automatically adding tags, automatically creating timed activities in a specified number of days after entering a stage of workflow, creating a note, and sending browser/mobile notifications to get notified with a customized text when something happens. Lastly, managing your automations has never been easier by viewing results of completed automations through the history view.

Nimble’s workflow automations are essential for any repeated process as it saves significant time re-entering data, logging activities, and messaging contacts.
If you find yourself constantly manually setting reminders, sending follow-up emails, assigning tags, or creating activities, it’s time to take the backseat and let workflows work for you.
Using Workflow Automations saves you time on manual reminders, to-do’s, and enables you to define triggers of who is assigned and where the action happens, as well as triggered actions when contacts move from one stage to the next.
Free Guide
The ABCs of CRM
A Beginner's Guide to Understanding &
Using a CRM
Download Free
You’re All Set!
DownloadGet the most out of this guide by starting your free 14-day trial of Nimble today.
How to Set Up your Workflow Automations
Selecting a Workflow for Automations:
Before defining your triggers and creating actions, the first step to take is deciding which workflow to create and manage automations. Here are the steps to defining your workflow of choice:
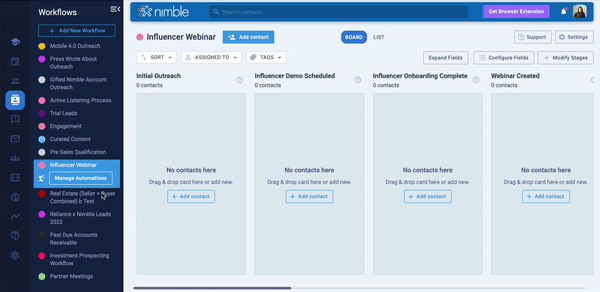
- Find the automations tab by clicking the workflow tab on left sidebar and hover over your desired workflow
- Underneath your highlighted workflow, click the “manage automations” button.
- Once you’ve found the automations tab, it’s time to create an automation for your workflow!
- Click from any of the action options you choose for your automation.
Defining Your Triggers for your Workflow:
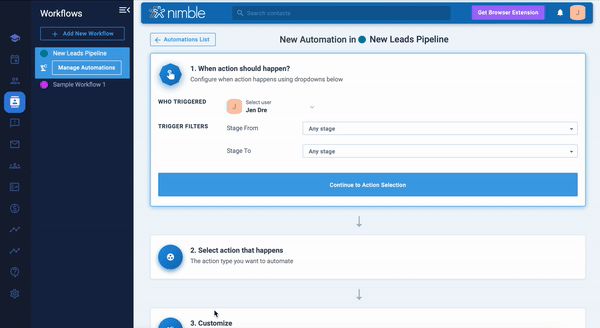
After you’ve chosen your workflow, now you need to define your triggers. Your triggers filters can be defined as the person who is being triggered, and the stages that are being triggered. To begin defining your triggers:
- To begin defining your triggers, choose the user you wish to be triggered by selecting from the dropdown menu. This assignee will trigger the action.
- Then choose what stage of the workflow from and to the trigger will be activated. You can also choose when a contact has entered the workflow.
Defining Actions for your Workflow:
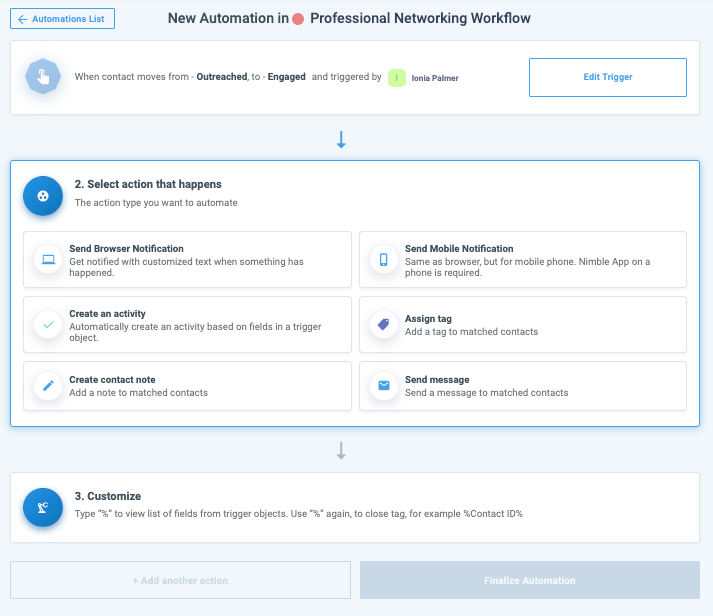
After you have selected your triggers, it’s time to define the actions taken in the stages of your workflow!
- Once your desired triggers have been selected, it’s time to create your activities!
- Begin to customize your selected automation by deciding which actions you’d like to take in a workflow
Here is a Handy List of Actions You Can Take
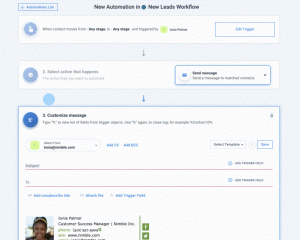
Send Templated Emails:
If you choose to send a templated email, choose “Send message” and you’ll be able to create a message or choose from a template that is then sent to your contacts who are moved to the stage you selected.
When creating a message to use for an automation, the email address that is selected from the dropdown is the email address it sends from, regardless of the person moving the contact card. It’s also important to note that you can track your open and click rates on automated messages too!
For example, suppose you’re in the process of expanding your team and hiring. In that case, you can set up a templated message to invite candidates to an interview by using Nimble Prospector to capture contact records directly from Indeed to add to our templated hiring workflow. From there, once a contact enters the hiring workflow or specific stage, it will automatically send a templated message to that candidate!
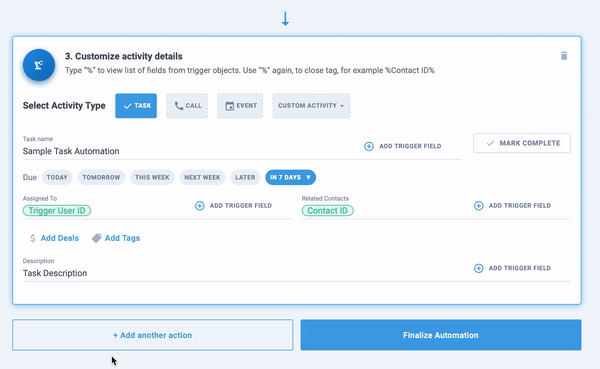
Automatically Create an Activity:
To create a custom activity when a contact moves into a different stage, you can set up a trigger that assigns yourself or another team member to complete a reminder, call, or event with due dates.
This gif shows the options of activities you can automate.For example, if you want to remind yourself or another team member to complete a task a number of days after a contact has entered a specified stage, you can create a task reminder and choose the amount of days until the task is triggered.

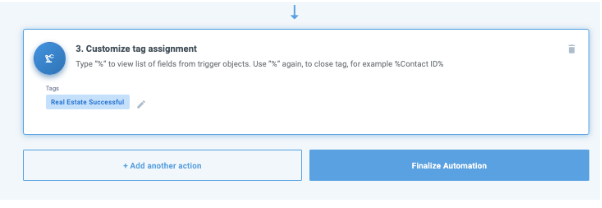
Automatically Add Tags:
You can also assign tags when a contact enters the workflow or specific stage by selecting “Assign tag” action type. A tag will be applied to the contact record of any contact moved to the selected Workflow stage.
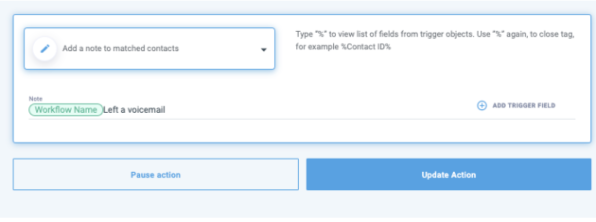
Create a Contact Note:
When a contact enters a specific stage, you can create a contact note and customize your note and it will appear on the associated contact record.
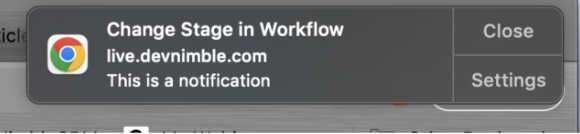
Send Browser/ Mobile Notifications:
Setup browser and mobile notifications so that you receive personalized messages when a contact has been placed in a particular stage.
Managing your Automation:
After you created your triggers and automation actions, it’s time to manage your automations!
- From here you can create an automation name to easily refer to it in the future.
- You can then continue to add more sections if needed, or finalize your automation!
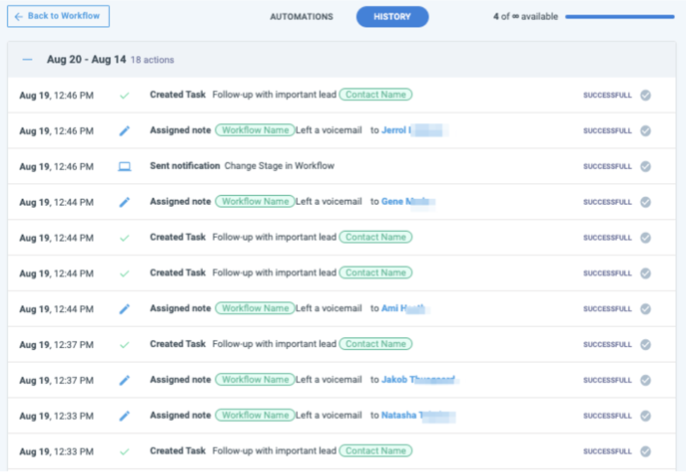
Once you’ve created your automation, you can easily view the history of each occurrence, so when an automation occurs, Nimble will keep track of the results of completed automations under “History”. Such as “task created”, message sent”, etc.
How to Upgrade your Automation Limits:
Workflow Automations are available for Business, Trial, and Microsoft plans. It includes the ability to create 25 automations. If you’d like to purchase more, you can do so in increments of 25 for an additional $10/month.
Setting Permissions for Automation:
If you’re working with a team, users can manage workflows and set permission with other licensed users. The admin of the account can set these permissions within Settings >> Privacy Settings when choosing “Managing workflows”.
At Nimble we strive to listen to our customers and add improvements based on their feedback and needs. We are committed to constantly improving our CRM to fit the needs of both your professional and personal goals. Please share with us how we can continue to improve our product and our service because that’s how we all grow!
More Automations To Come…
Automation for Workflows is just the beginning. We will be adding Automations to many of our most loved features including Deals, Contacts, and Messaging. We will also be adding more Automation triggers and actions to expand what you can do with contacts.
Keep an eye out for upcoming Nimble Updates and don’t forget to read about our latest updates by checking out our Product Updates Blog!
For a complete General Overview of Nimble’s Workflow Automations, feel free to read our Workflow Automations Support Article. If you want a deeper understanding of workflows read our Workflows Blog Post!
If you have any questions, please write to us at [email protected], initiate a chat from this FAQ, or join one of our Nimble Onboarding and Best Practices sessions, held every weekday at 9 AM PT.