You should be. Nimble’s custom fields and search tools help you drill down into your social media interaction. It’s easy.
 You’ve probably already learned about how Nimble can unify your contacts’ social streams, giving you a comprehensive view of their online identities.
But as a salesperson, it’s important that you be able to sift through your entire database and find those individuals who are more likely to become customers than others. Nimble offers powerful, deep searches based on custom fields that you establish – and it only takes a few minutes to set up.
A Simple Process
First step: Build a new tab for your Contact pages. Click on Settings in the upper right corner, then on Data Fields in the vertical column on the left. You’ll see your existing tabs, Contact Info and Other. Click + New Tab.
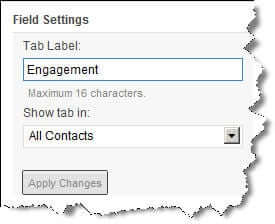
 A new, unnamed tab opens. Give it a name by replacing the text in the Tab Label field under Field Settings on the right.
Below that, choose whether to show the tab in All Contacts, People only or Companies only by clicking on the drop-down list. Click Apply Changes, and your newly named tab appears.
Smart Custom Fields
Next up: creating a set of data fields for that tab. Think carefully about this before you start. You might want to, for example:
- Pull out prospects in a specific sales region
- Find everyone who “Liked” you
- Earmark visitors who have lodged a complaint
- See a list of visitors who you’ve engaged in a chat
- Indicate groups that are interested in a specific offering of yours
- Separate individuals who requested a sample or other free content.
You’re going to want to focus on information that a subset of your contact list will share, since you’ll be able to name each field and indicate what kind of information you anticipate being entered there.
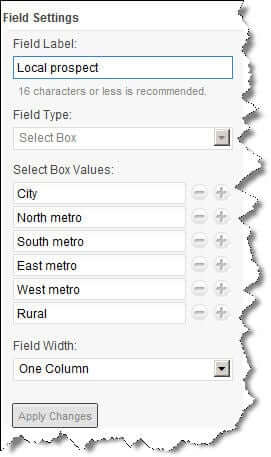
Make sure that your new tab is open. To add a field under it, click + New Field. On the right, under Field Label:, enter a short name for that field.
Click on the arrow under Field Type: to open the list and select a type. Your choices are:
- Single Line Text

- Multi Line Text
- Select Box (multiple choice, like Yes/No, City/Suburbs/ Rural, White Paper/eBook/Sample/Webinar)
- Separator (a horizontal line)
- Address (fields for name, address, city, state, country)
If you’ve chosen Select Box for any of them, provide a list of acceptable answers. Enter the first in the box below Select Box Values, then click + to add more until you’re done. You’ll also be able to choose between one-column and two-column displays. And you can drag and drop to rearrange the fields.
When you’re satisfied with each choice, click Apply Changes. Continue to click + New Field until you’ve created all of your custom fields. As you add each one, you’ll see it take its place under your new tab.
Seeing it in Action
Now you can see how your new fields look under your new tab in actual contact records. Open one and click the Contact info. icon if that screen is not not already open.
Click on your new tab. Since you’ve not filled out any records yet, you’ll get a message that says, This tab has no data. Click here to edit. And, Poof! There are your brand new custom fields, ready for you to complete. When you’re done, click Update.
Once you’ve started filling out a form, you can always return to this page by clicking the main system Edit button.
Finding the Common Denominators
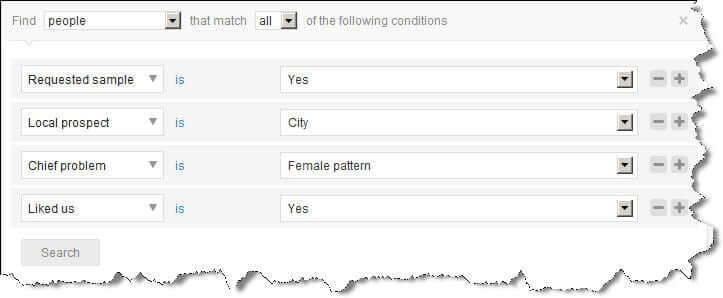
Finally, you can begin to search for individuals or companies that share characteristics. In the upper right corner of the screen, next to Search Contacts, click Advanced. Click the arrow next to the first drop-down list and indicate whether you want to search people, companies or both. Click is, and a small box opens, providing filtering options (contains, is not, is empty, etc.)
The next drop-down list lets you choose between searching for contacts who meet any of the conditions or all of them.
On the next line down, click the arrow and scroll down until you reach the title of your new tab (your custom fields will be at the bottom of the list). Select one and click the down arrow next to the field to its right. Click the arrow and select the answer you’re seeking. Click + to add another condition.
When you’ve finished, click Search, and Nimble will return a list of matching records. You can use Nimble’s other tools to initiate further contact with them.
Custom fields and Advanced search are two of Nimble’s most effective tools for fleshing out your contact profiles and identifying promising sales leads. They should be frequently-used tools in your social relationship management toolkit.


